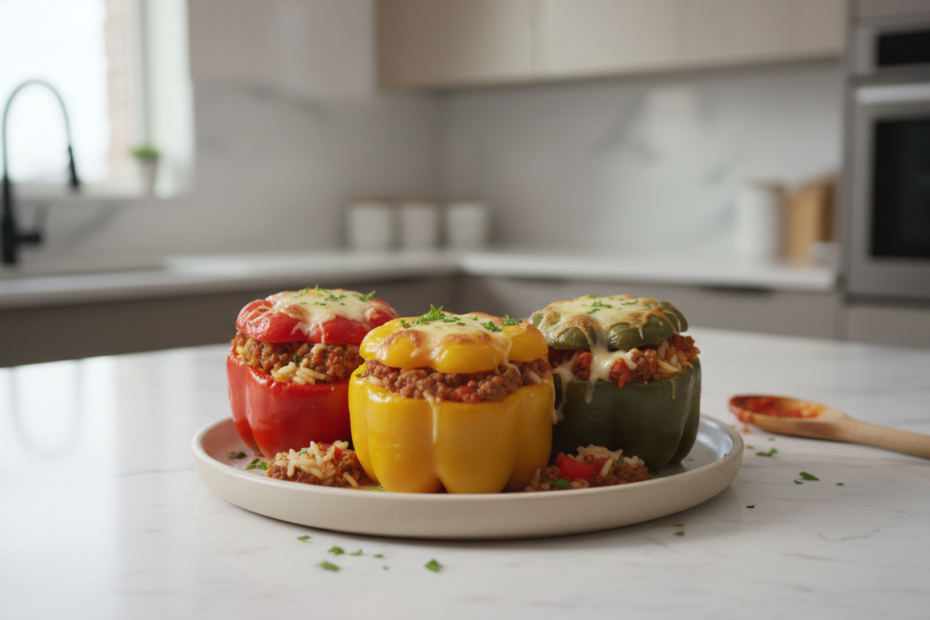
These classic stuffed bell peppers are everything a weeknight dinner should be — colorful, hearty, and packed with bold flavor. Filled with seasoned ground beef, fluffy rice, and rich tomato sauce, they hit the table looking like something special while requiring minimal effort. Whether you’re feeding a hungry family or meal-prepping for the week, this recipe delivers every single time.
Follow this simple, foolproof guide and you’ll have perfectly tender, deliciously stuffed bell peppers on the table in under an hour — with easy tips, smart variations, and zero guesswork.
[toc]
Why You’ll Love This Stuffed Bell Peppers Recipe
First and foremost, stuffed bell peppers are a true one-dish wonder. You get your protein, your starch, and your vegetables all baked together in one beautiful, edible bowl. That means less cleanup, less stress, and more time enjoying dinner with the people you love.
This recipe is also incredibly family-friendly. Kids love the fun presentation, and adults appreciate the deeply satisfying, savory filling. Because each pepper is its own individual serving, it’s easy to customize — swap the protein, change the grain, or adjust the spice level to suit everyone at the table.
Finally, this dish is a meal-prep champion. Stuffed bell peppers store beautifully in the fridge and reheat like a dream, making them just as good — if not better — the next day. Once you try this recipe, it’ll earn a permanent spot in your dinner rotation.
Ingredients You’ll Need
- 6 large bell peppers (any color) — the edible vessels; red and yellow are sweeter, green are more savory
- 1 lb (450g) ground beef — the hearty protein base that makes this filling so satisfying
- 1 cup cooked white rice — binds the filling and adds bulk; long-grain works best
- 1 can (15 oz) tomato sauce — adds moisture, acidity, and deep tomato flavor throughout
- ½ cup diced onion — builds a savory aromatic foundation in the filling
- 3 cloves garlic, minced — adds depth and warmth to every bite
- 1 tsp Italian seasoning — a balanced herb blend that ties all the flavors together
- 1 tsp salt — essential for seasoning the filling properly
- ½ tsp black pepper — adds a gentle kick of heat
- 1 cup shredded mozzarella cheese — melts beautifully on top for that irresistible golden finish
- 2 tbsp olive oil — for sautéing the aromatics without sticking
- Fresh parsley, chopped — optional garnish that adds color and freshness
Substitution Notes: Ground turkey or chicken works perfectly in place of beef for a lighter option. Brown rice, quinoa, or cauliflower rice can replace white rice for added nutrition or a low-carb spin. Cheddar, Monterey Jack, or a Mexican blend all melt beautifully if you’d prefer to switch up the cheese. Also see our easy weeknight dinner ideas for more inspiration.
Prep & Cooking Time
Prep Time: 15 minutes
Cook Time: 40 minutes
Total Time: 55 minutes
Servings: 6 stuffed peppers
Difficulty: Easy
How to Make Stuffed Bell Peppers Step by Step
Making stuffed bell peppers from scratch is straightforward and deeply rewarding — here’s exactly how to do it perfectly every time.
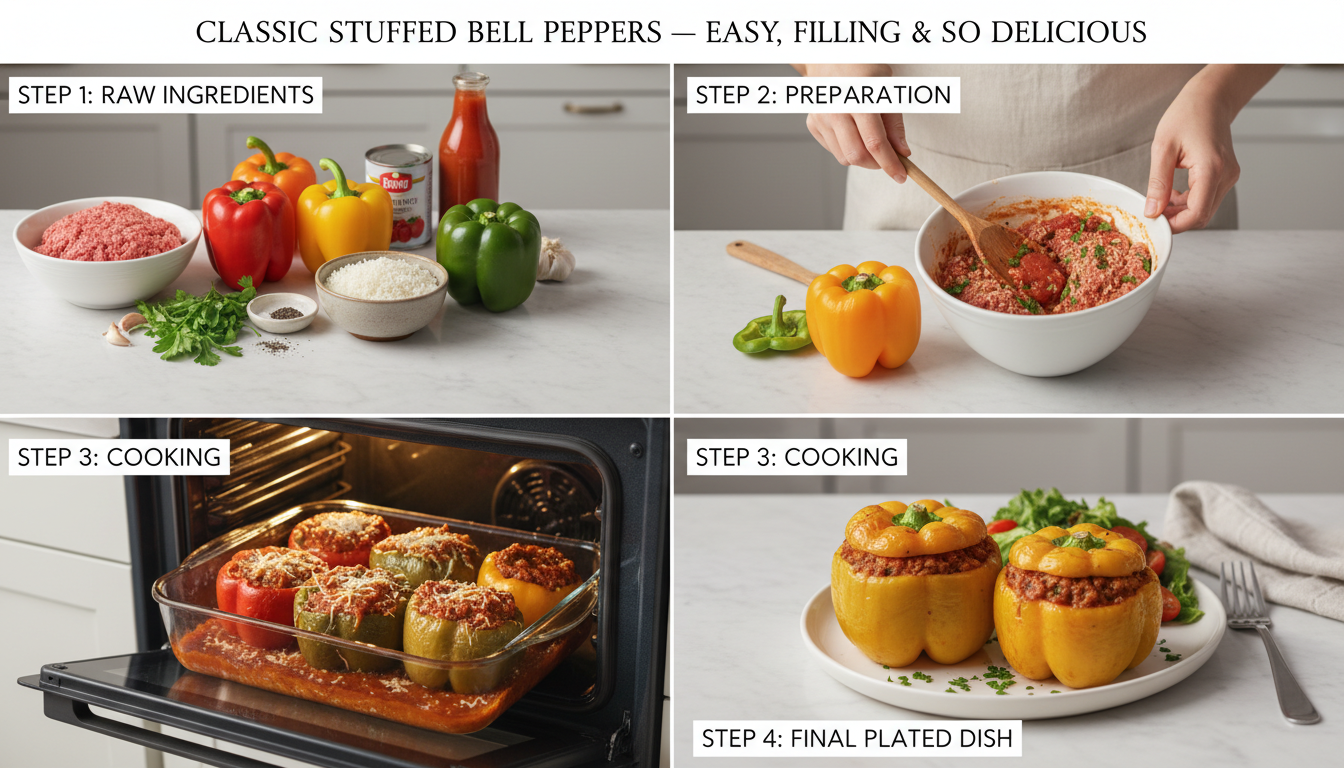
- Preheat your oven to 375°F (190°C). Lightly grease a 9×13-inch baking dish and set aside. Starting with a hot oven ensures even baking and that golden, bubbly cheese topping.
- Prepare the bell peppers. Slice the tops off each pepper and remove the seeds and membranes. If needed, trim a tiny sliver from the bottom so they stand upright without tipping. Arrange them cut-side up in the prepared baking dish. Tip: Blanching the peppers in boiling water for 3 minutes before stuffing gives them an even softer, more tender texture after baking.
- Sauté the aromatics. Heat olive oil in a large skillet over medium heat. Add the diced onion and cook for 3–4 minutes until softened and translucent. Add the minced garlic and stir for another 60 seconds until fragrant. This step builds the flavor foundation of your entire filling.
- Brown the ground beef. Add the ground beef to the skillet with the aromatics. Cook, breaking it up with a wooden spoon, until fully browned — about 6–8 minutes. Drain any excess fat carefully. Well-browned meat adds a deeper, richer flavor to the finished dish.
- Build the filling. Stir in the tomato sauce, cooked rice, Italian seasoning, salt, and black pepper. Mix everything together thoroughly and let it simmer on low heat for 3–4 minutes so the flavors meld and the sauce thickens slightly. Taste and adjust seasoning as needed — this is your moment to make it perfect.
- Stuff the peppers generously. Spoon the beef and rice mixture into each prepared bell pepper, pressing it in gently and mounding it slightly above the rim. Don’t be shy — a full, heaping pepper is the goal. Distribute the filling evenly across all six peppers.
- Add cheese and bake. Sprinkle the shredded mozzarella generously over the top of each stuffed pepper. Cover the baking dish tightly with aluminum foil and bake for 30 minutes. Then remove the foil and bake for an additional 10 minutes until the cheese is melted, bubbly, and lightly golden. Tip: For extra browning, broil for the last 2–3 minutes — watch closely so the cheese doesn’t burn.
- Rest and garnish. Remove from the oven and allow to rest for 5 minutes before serving. Sprinkle with freshly chopped parsley for a pop of color and freshness. Serve hot directly from the baking dish.
Nutritional Benefits of Stuffed Bell Peppers
Stuffed bell peppers are more than just delicious — they’re genuinely nourishing. Bell peppers are an outstanding source of Vitamin C, with a single medium red pepper providing over 150% of the recommended daily intake. They also deliver Vitamin A, folate, and a range of antioxidants that support immune health and reduce inflammation. The ground beef filling contributes high-quality protein and iron, both essential for sustained energy and muscle maintenance. Rice provides complex carbohydrates for steady fuel, while the tomato sauce adds lycopene — a powerful antioxidant linked to heart health. According to Healthline’s detailed nutritional profile of bell peppers, regular consumption of bell peppers may also support eye health and reduce the risk of chronic disease. This makes stuffed bell peppers one of those rare meals that’s as good for your body as it is for your taste buds.
Tips, Variations & Cooking Advice
1. Boost the Flavor: For a richer, more complex filling, add a tablespoon of Worcestershire sauce or a teaspoon of smoked paprika when browning the beef. These small additions make a surprisingly big difference in depth and savoriness.
2. Make It Vegetarian: Swap the ground beef for a hearty combination of black beans, corn, diced zucchini, and mushrooms. Season with the same herbs and spices — you won’t miss the meat, and the texture is absolutely satisfying. These meatless stuffed bell peppers are perfect for Meatless Monday!
3. Try Different Grains: Quinoa adds extra protein and a slightly nutty flavor. Cauliflower rice keeps things light and low-carb. Farro brings a chewy, wholesome texture. Any of these swaps work seamlessly in this recipe.
4. Storage Made Easy: Store leftover stuffed bell peppers in an airtight container in the refrigerator for up to 4 days. They’re just as good reheated — simply microwave for 2–3 minutes or warm in a 350°F oven for 15 minutes covered with foil.
Common Mistakes to Avoid
Undercooking the peppers: If you skip blanching and don’t bake long enough, the peppers can come out firm and slightly bitter. Make sure to bake covered for the full 30 minutes before uncovering for the cheese step. If you like very tender peppers, add 5 extra minutes of covered baking time.
Under-seasoning the filling: Rice absorbs flavor quickly, so a filling that tastes perfectly seasoned in the pan can taste bland once baked inside the pepper. Always taste and slightly over-season the mixture before stuffing — it will balance out beautifully during baking.
Using too-small peppers: Small peppers don’t hold enough filling and can overcook before the cheese gets golden. Choose large, wide bell peppers with flat bottoms so they stand upright, hold plenty of filling, and cook evenly.
Skipping the foil cover: Baking uncovered from the start causes the filling to dry out and the peppers to brown too quickly on the outside. Always start covered, then uncover only for the final 10 minutes to melt and brown the cheese.
Serving Suggestions & Storage
Stuffed bell peppers are a complete meal on their own, but they pair wonderfully with a simple green salad, crusty garlic bread, or roasted vegetables on the side. A dollop of sour cream on top takes them over the edge in the best possible way. For a Mexican-inspired twist, serve alongside guacamole and tortilla chips.
Refrigerator Storage: Allow peppers to cool completely before storing. Place in an airtight container and refrigerate for up to 4 days. Reheat in the microwave (2–3 minutes on high) or covered in a 350°F oven for 15–20 minutes.
Freezer Storage: These freeze exceptionally well. Wrap each pepper individually in plastic wrap, place in a freezer-safe bag, and freeze for up to 3 months. Thaw overnight in the refrigerator before reheating. This makes them ideal for batch cooking and future busy weeknights.
Conclusion
There’s a reason stuffed bell peppers have been a beloved dinner staple for generations — they’re colorful, comforting, endlessly customizable, and genuinely satisfying in every way. With this easy, foolproof recipe, you’ll nail them on your very first try. Whether you’re making them for a weeknight family dinner or prepping ahead for a stress-free week, this dish never disappoints. Explore more hearty, crowd-pleasing recipes on our comfort food recipes collection and keep the inspiration flowing. Now grab those peppers — dinner is waiting!
Frequently Asked Questions About Stuffed Bell Peppers
Can I make stuffed bell peppers ahead of time?
Absolutely! You can assemble the stuffed bell peppers up to 24 hours in advance, cover the baking dish tightly with plastic wrap, and refrigerate until ready to bake. When you’re ready, remove from the fridge 15 minutes before baking, then bake as directed, adding 5–10 extra minutes since they’ll be going in cold.
Do I need to pre-cook the rice before stuffing the peppers?
Yes — always use pre-cooked rice in this recipe. Raw rice does not cook through properly inside the pepper during the baking time and will result in a crunchy, undercooked filling. Leftover rice works perfectly and is a great way to reduce food waste.
What color bell peppers are best for stuffed bell peppers?
All colors work beautifully, but the color does affect the flavor. Red, orange, and yellow peppers are sweeter and milder, making them the most crowd-pleasing choice. Green peppers are slightly more bitter and hold their shape very well during baking. Use whatever color you love most — or mix and match for a beautiful, colorful presentation on the table.
Can I freeze stuffed bell peppers after baking?
Yes! Baked and cooled stuffed bell peppers freeze very well for up to 3 months. Wrap each one individually in plastic wrap and store in a freezer-safe zip-lock bag. To reheat, thaw overnight in the refrigerator and then warm in a 350°F oven covered with foil for 20–25 minutes, or microwave on medium power until heated through.